Warning: preg_replace(): The /e modifier is deprecated, use preg_replace_callback instead in ..../includes/class_bbcode.php on line 2958

Warning: preg_replace(): The /e modifier is deprecated, use preg_replace_callback instead in ..../includes/class_bbcode.php on line 2968

Warning: preg_replace(): The /e modifier is deprecated, use preg_replace_callback instead in ..../includes/class_bbcode.php on line 2958
AMC V8 Serpentine Belt system
Results 1 to 4 of 4

Thread: AMC V8 Serpentine Belt system

  1. #1

    AMC V8 Serpentine Belt system

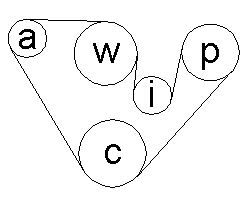
    AMC V8 Serpentine belt system is shown here. It utilizes a 78.50" 6 rib one sided belt (Part number #4060775 and 4060763 for 10% under-drive). System also utilizes the 707 alternator relocation bracket kit (supplied in the Serpentine kit). The factory power steering and water pump stud is required for proper assemly. The crankshaft pulley is available in stock and 10% under-drive diameters.
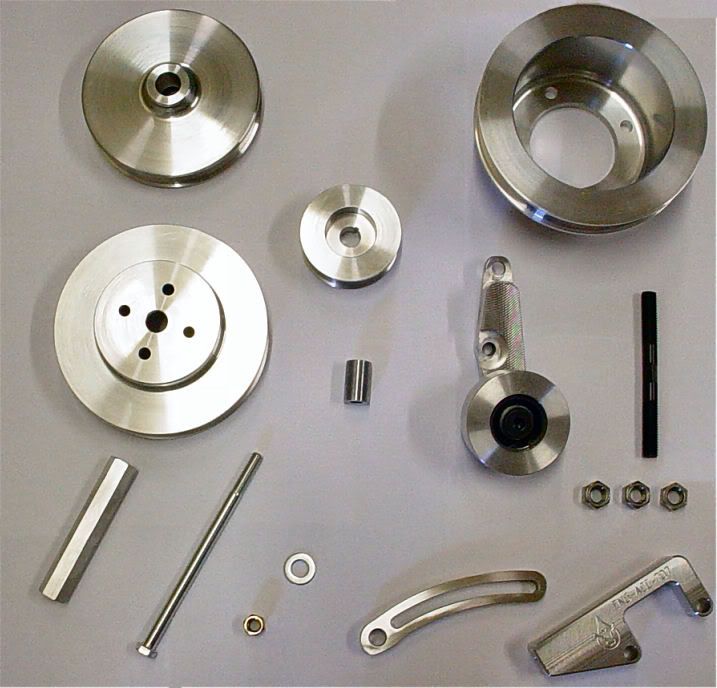
    Kit includes

    1. Custom Poly V crankshaft pulley (stock or 10% under-drive)
    2. Custom Poly V water pump pulley
    3. Custom Poly V power steering pulley (available in press-on or keyway style pumps)
    4. Custom Poly V alternator pulley (available in 5/8" key way or .669 slip fit)
    5. 707 alternator relocation bracket assembly
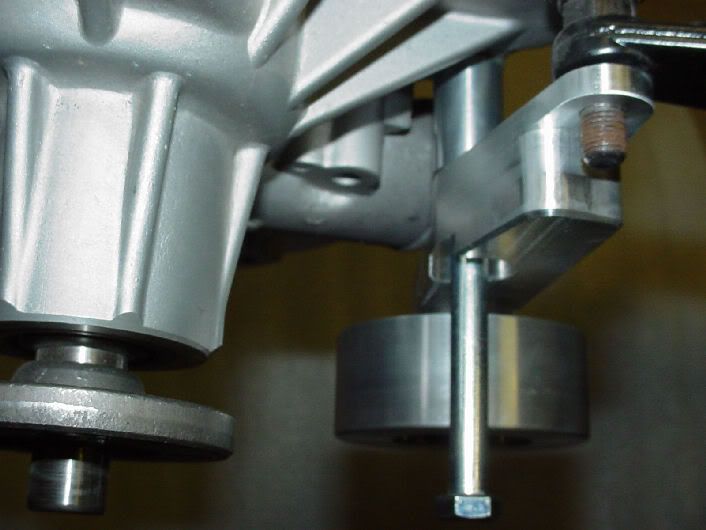
    6. Smooth 2.875 Idler wheel
    7. 1" thick Idler wheel bracket
    8. Assembly hardware


    Trouble ordering? Call 651-257-7917 or try Email Orderbulltear@yahoo.com

  2. #2
    Thank you from BT ULTIMUS MAXIMUS STATUS jeepsr4ever's Avatar
    Join Date
    Dec 2002
    Location
    Minnesota
    Posts
    10,042
    SERPENTINE INSTALL

    Installing the Bulltear AMC V8 serpentine system is not a hard task to do. What you will need are basic tools to complete the task.

    1. 9/16" socket and wrench
    2. 1/2" wrench
    3. Power steering pulley puller (or a large hammer if you arent saving your old power steering pulley)
    4. 2 x 2-1/4" 3/16" long bolts

    Because of the different years of options on AMC V8 engines some pulley kits may have different pullies. We have options to cover any and all variations of accessories so if you have a mixed year engine system we can accomodate your build. These vary..

    1. Crankshaft pulleys come in two different types, 3 bolt harmonic balancers and 4 bolt harmonic balacers.
    2. Water pump pulleys come in 2 different depths but share the same bolt pattern, early 67-72 and later model 73-91
    3. Power steering pulleys come in 3 different types, Eaton 17MM keyway, Saginaw .748" (3/4 press on) and Saginaw 5/8" keyway style.
    4. Alternator pulleys come in 3 different types, 5/8 keyway, 17mm slip and 17mm slip with .150 spacer.

    ** REF. ** All alternators are not made equally and with most higher output alternators you use the 17mm through hole. Some alternators require a spacer due to the large metal fin style cooling fan mounted directly behind the pulley. This fan sticks out past the pulley and will need a spacer (not needed for plastic chevy style fans).

    ** REF. ** Alternator spacers use either a 3/8 or 7/16 bolt that is 7"s long. This is used depending on head casting and year. Some heads use a larger 7/16" hole in the end for the spacer and some use 3/8". The kit supplies both bolts so one will be left over.

    ** REF. ** Eaton style power steering pumps use the power steering pulley where the hollow side faces forward. Those with newer style pumps without retaining nut but with allen head shaft use the .748 (3/4 press on type pulley) type pulley. Those with retaining bolt use the 5/8 keyway style pulley.

    Getting started

    Check the contents of your kit you should have recieved the following.

    1. Crankshaft pulley
    2. Water pump pulley
    3. Alternator pulley
    4. Power steering pulley
    5. Alternator bracket assembly (dogleg piece with stud mounted swingarm)
    6. Alternator hexagonal aluminum spacer
    7. 1.20" long .750" diameter aluminum spacer
    8. Idler pulley assembly (Pulley with bearing attached to bracket)
    9. 1 3/16"x6.5" long bolt (for idler wheel bracket)

    REMOVE ALL BELTS BEFORE INSTALLATION

    Crankshaft pulley installation

    Depending on the year of the crankshaft you could have one of the following.

    1967-1971 (mid 1971) 3 bolt harmonic balancer
    Mid 1971-1991 4 bolt harmonic balancer

    Remove the bolts from the pulley (3 or 4 bolts) and place bolts aside. Clean mounting surface and line up billet serpentine crankshaft pulley. Using your OEM bolts or new bolts attach billet pulley to your harmonic balancer. 35-45ft lbs

    *Note 3 bolt harmonic balancers MUST be very clean as the ring on the end of the pulley centers the pulley

    Water pump pulley installation

    There are 2 different water pump pulleys we use in our kits depending on the year of the water pump used. Subsequently their are two different depths as well.

    Remove the water pump pulley from the water pump by taking off the 4pcs 5/16" (1/2" bolt head) bolts or nuts (if you are using studs) and remove water pump pulley. Clean the end of the pump hub and install billet serpentine water pump pulley. Attach fan if you had one installed or simply bolt on billet water pump pulley. 30-35ft lbs

    Alternator pulley and bracket installation

    This kit comes with a new alternator bracket. This bracket eliminates all OEM bracketry and mounting bolts. Remove your old bracket noting any area where the bracket bolts go through the water pump or timing cover. These areas must be tightened either using original bolt or new shorter bolt. They are critical to engine cooling and sealing.

    Take the two 3/16" bolts out of the first two holes on the passenger side of the intake. Attach the dogleg portion of your alternator bracket to the intake using 2x2-1/4" 3/16" grade 5 or better bolts. Next take your alternator and place the 3/16 or 5/16 adjustment screw in the swing arm and lightly tighten your alternator. Check to see which one of the 7" long bolts you will be using (depending on year of head either 7/16" or 3/8"). Next run the factory 7" bolt (7/16" or 3/8") through the bottom of your alternator and through the hexagonal billet spacer and into your passenger side head and in one fo the mounting holes in the head facing the radiator. You can tighten at this time however we will be using the alternator for adjustment later when the rest of the kit is installed.


    Install the alternator pulley by first removing the stock pulley from your alternator. (See ** ref ** about pulley styles) Attach the Bulltear billet serpentine pulley to the alternator 30-35ft lbs.


    Power steering pulley installation

    Eaton pump (early 67-70)

    Remove the large retaining nut from the power steering shaft. Remove pulley using pulley puller or small hammer (if your not going to save the pulley) tapping in a circular pattern to loosen pulley off pump shaft. Install the Bulltear serpentine power steering pulley with the hollow side facing out and thread bolt on and tighten 30-35ft lbs.

    Saginaw pump (later 71-91)

    5/8 keyway pulleys

    Remove pulley by taking off large retaining nut (only applies to 5/8 keyway pulleys) and remove pulley with pulley puller or small hammer (if your not going to save the pulley) tapping in a circular pattern to loosen pulley off pump shaft. Install the Bulltear billet serpentine pulley onthe 5/8" key way shaft and tighten retaining nut to 35-40ft lbs.


    On 3/4 press on pulleys use power steering pulley puller or small hammer (if your not going to save the pulley) tapping in a circular pattern to loosen pulley off pump shaft. There are a couple ways to install the press fit pulley. One is to add heat to the pulley either via propane torch or letting sit in hot water and slipping on shaft. You can also use a wood block to pound the pulley on the shaft however we suggest heating the pulley to just about too hot to touch and installing.


    Idler pulley and bracket installation

    The idler pulley bracket uses the factory power steering bracket retaining stud found in the front of the motor on the drivers side upper bolt of the water pump. This stud is 3/8-24 fine thread on the outer end. This stud has an incorporated hex head and has course threads. Its main job is to tighten the timing cover and water pump and on the outer most end mount the power steering torque arm. We will be using this stud for the serpentine idler bracket installation as well as the lower 3/8" water pump bolt hole but not the lower 3/8" bolt.


    Remove the upper 3/8-24 retaining nut on the power steering torque arm located onthe water pumps drivers side. Remove the 3/8 bolt located directly underneath the water pumps main cavity. Place idler bracket on the power steering torque arm stud and let it swing. Using the 6.5" long 3/8" bolt and the 1.25" long aluminum spacer install the bolt thorugh the idler bracket and the spacer behind it. Tighten this bolt to 35-40ft lbs. Next using the OEM 3/8-24 (fine thread) nut tighten the top hole of the idler bracket against the power steering torque arm and tighten to 35-40 ft lbs.

    Belt installation

    The belt we use for this kit is a 77.5" long belt. Most mfgs will call it a 60775 meaning 6 rib one sided 77.5" long belt. Some mfgs call this a 4060775 as well. Belts we suggest for this kit

    Gates Master Pro 060775
    Goodyear Gatorback 60775

    Install belt like and run it like this


    Using the alternator tighten belt and then tighten alternator retaining bolt and you have just finished your installation. If you have any issues with installation please drop us a line at Orderbulltear@yahoo.com or a phone call at 651-433-3689
    Last edited by jeepsr4ever; 03-21-2016 at 07:57 AM.
    [COLOR=#000000]
    Featuring www.StarLabCNC.com[/URL] for CNC plasma machines
    1-651-433-3689 TOLL FREE 1-855-433-3689

  3. #3
    Bulltear forum member New to the forum
    Join Date
    Mar 2012
    Location
    United States
    Posts
    2
    Hi,

    I purchased a serpentine system for my 1974 AMC Javelin AMX. I has the Sanden compressor conversion, Powermaster 140 amp alternator, factory power steering, and high flow aluminum water pump. My system did not include instructions, a belt, or all the necessary hardware. My shop is asking me for instructions and what belt to use. Can you please help? Thanks,

    Scott

  4. #4
    Thank you from BT ULTIMUS MAXIMUS STATUS jeepsr4ever's Avatar
    Join Date
    Dec 2002
    Location
    Minnesota
    Posts
    10,042
    [COLOR=#000000]
    Featuring www.StarLabCNC.com[/URL] for CNC plasma machines
    1-651-433-3689 TOLL FREE 1-855-433-3689

Posting Permissions

  • You may not post new threads
  • You may not post replies
  • You may not post attachments
  • You may not edit your posts
  •  
Bulltear Ad