Warning: preg_replace(): The /e modifier is deprecated, use preg_replace_callback instead in ..../includes/class_bbcode.php on line 2968
Warning: preg_replace(): The /e modifier is deprecated, use preg_replace_callback instead in ..../includes/class_bbcode.php on line 2958
Warning: preg_replace(): The /e modifier is deprecated, use preg_replace_callback instead in ..../includes/class_bbcode.php on line 2958 Mavs Build - Page 4
Yours says out for delivery. You wanted this shipped to a terminal correct? They will be calling you before days end. There are also UPS boxes coming your way with hardware, slats and cable carrier.
Just got the call, hope I wasnt to offensive I get mad easily and had a crappy day. Im just to impatient, getting a call so late wasnt something I expected. OMW to pick it up now
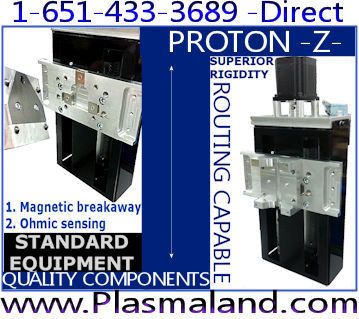
did the z axis torch carrier change? it looks like the one in the picture, but is different from creepys build. It has a switch already mounted in it, and an anodized black part with 45* out of the corners that rides on the z threaded rod. is that the Torch height switch after it touches off? or is there more parts for the z Axis in the ups shipment.
And did anyone notice the gear rack is double sided taped to the aluminum? seems kinda scary specially here since its so humid id be worried it will move or start to side to side when the motor turns on it, or does no one have issues with this? I seen creepys style was welded on I wiggled the edge alittle, maybe it will help since it gives a little no real lash issues but I dunno
That is the finer action Z axis. The two bottom poles on the limit switch are the ones you solder to and wire for torch height touch off. The tape will actually help with backlash and cushion the gear. We have been using it for more than a year now with zero failures even when using a 1/2" wide rack and routing heavily. Fear not :D We even had a machine get flipped over by the trucking company...bent the motor shaft and destroyed the gear but didnt budge the gear rack.
I like the look and the switch on my z axis pretty nice set up.I think creepy said it in his post the roller bearings that guide in the v rail already being half assembled is bad, some of the hardware fell off, and since mine gantry wasnt boxed fully just framed with 2 x 4s there gone, its no big deal shit happens. I opened up one box and seen the xbox controler pretty sweet you tossed that in. I was looking at amazon at the wireless set up but pretty cool you send a pendent with it. I was even looking at the original Nintendo NES usb controllers online and though that would be funny to use = )
So glad I watched the torchmate video on the 2 x 2 and seen they had a link to pirate and then was browsing through the tool shop forum = P plus I think someone name dropped bulltear on there to. ( This is subject to change If It works like poo, but Im sure it wont, im just excited atm. )
It does look like Ill have some time invested in square up the X rails to later on, but no sense in thinking about that til I finish welding table, the biggest decsion atm is what color to paint it!
Last edited by Mav68erick; 08-08-2011 at 07:24 PM.
I made my water tray as wide and the distance between my rails so its 55" distance on the inside, and there 56" long, I figured id leave it longer in case I had a big sheet it would help support it, hold more water. I guess if it looks bigger it has to run better somehow in the theory I was thinking at the time I decided to leave it long, but I could be wrong I was sweating really bad at the time.
So now I gotta go back to the steel store and have them take 5' sheet and hopin the cut it square, my inside dimensions 50" x 52" or if they make it 52" x 54" ill just lay it on top of the angle or the angle on top of that and lap seam weld it. and If I do the bottom I can do x % of it and just seam seal the bajesus outta it.
And never having a plasma when I was thinking about notching the angle, I though this is gonna suck if I use the 3" cut off wheels being 3/16 so I notched it with the chop saw first, then fired up the plasma and cut it in the gullet to cut the rest out and then ground what was left flat prolly coulda did better if I flipped it over and straight edged I could cut most the radius out to but it was still faster then the first idea.
Last edited by Mav68erick; 08-08-2011 at 07:33 PM.
bum bum bum bum.... So did some welding, no matter what you do welding vertical is a pita. Welded my water table frame top and bottom and ground it flush and blended the corners in. Being paraniod as Iam and worrying about things shifting during welded I leveled my table out, both rails 0.0 and the table supports 0.0 Then I laid a bar across both rails 0.0 both ends and the middle. Measured it corner to corner both ways 0.0 and 0.0. So then I decided to brace it as seen in the pictures. dont let the clamps fool you I tack welded it to my gear rack support rails and to the shorter pieces at the center. After I tacked it went back and checked it mostly all 0.0 and some 0.1s. So I labeled where I checked them and wrote it down. I then began to weld and skippng one side to the other not welding more then one spot and letting it cool, every 2-4 welds id go back and check all my points, dam thing never moved at all. I think it was a combination of the X brace and the fact it was 3/16 thick.
Now I dont think im gonna bother welding the bottom the water table support rails are welded on 3 sides and I added an extra I just cant see doing it, not that I cant I guess I could flip it with my brace still on there but Ive welded everything except the bottoms and my top rails to the legs do that tomorrow.
The levels only measures in tenths of a degree, should spent 10 dollars more when I bought it and got the .5 a tenth one. Id prolly drive my self crazy using that one. If it says .1 and I tap it and it bounces to 0, I usually assume its around .05* and to be honest the bubble in the level looks centerd, but .1 degree off over a 12 foot span is .2513 so a quarter of an inch, when I made my car jig it was all 0.0 except 1 half of the 11ft rail twisted down .1 and was about 3/32 lower then the other 3 corners so I made sure to compensate when I made my raiser support rails. Maybe Im just thinking to much into it = ) I just dont want a headache later trying to square and true up the rails and have binding issues, I know the guys making the torchmate tables have alot of problems even worse the bigger the table the more chance its off


 Posting Permissions


 Reply With Quote


